
II. Indications
- Emergent Vascular Access
- Allows for delivery of most fluids and medications (including Vasopressors), EXCEPT bicarbonate
III. Mechanism
- Entry into marrow cavity
- Allows rapid delivery into central access
- Marrow cavity entered most easily 6 years and younger
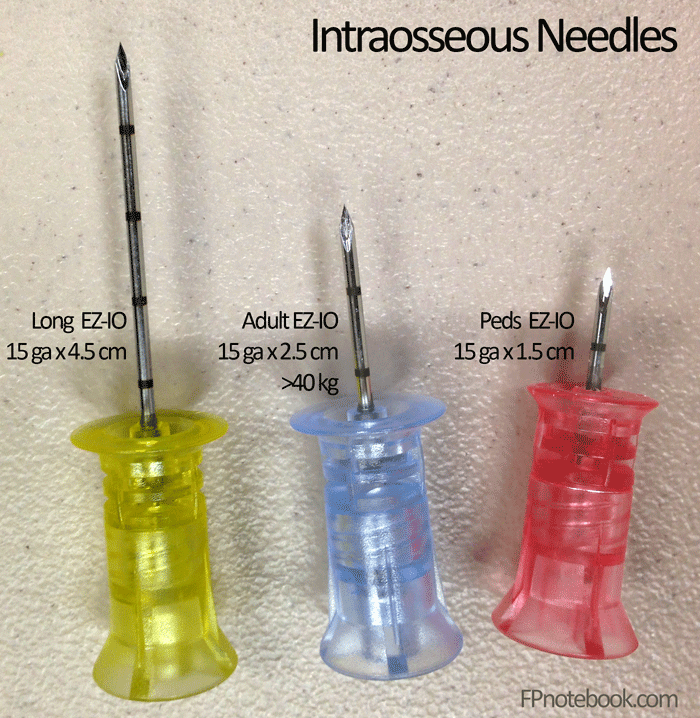
IV. Preparation: Intraosseous Needles (e.g. EZ IO)
- Infant (15 gauge, 1.5 cm long, Red EZ-IO)
- Indicated for children <3 kg
- Standard (15 gauge, 2.5 cm long, Blue EZ-IO)
- Indicated for children 3-39 kg, up to non-obese adults without significant excess soft-tissue
- Even in obese adults, may use for proximal tibial intraosseous (as long as tibial tuberosity is palpable)
- Long (15 gauge, 4.5 cm long, Yellow EZ-IO)
- Indicated for large, obese adults or significant excess soft tissue
- Humerus intraosseous
- Proximal Tibial intraossous if the tibial tuberosity is not palpable
- Indicated for large, obese adults or significant excess soft tissue
- Images
- References
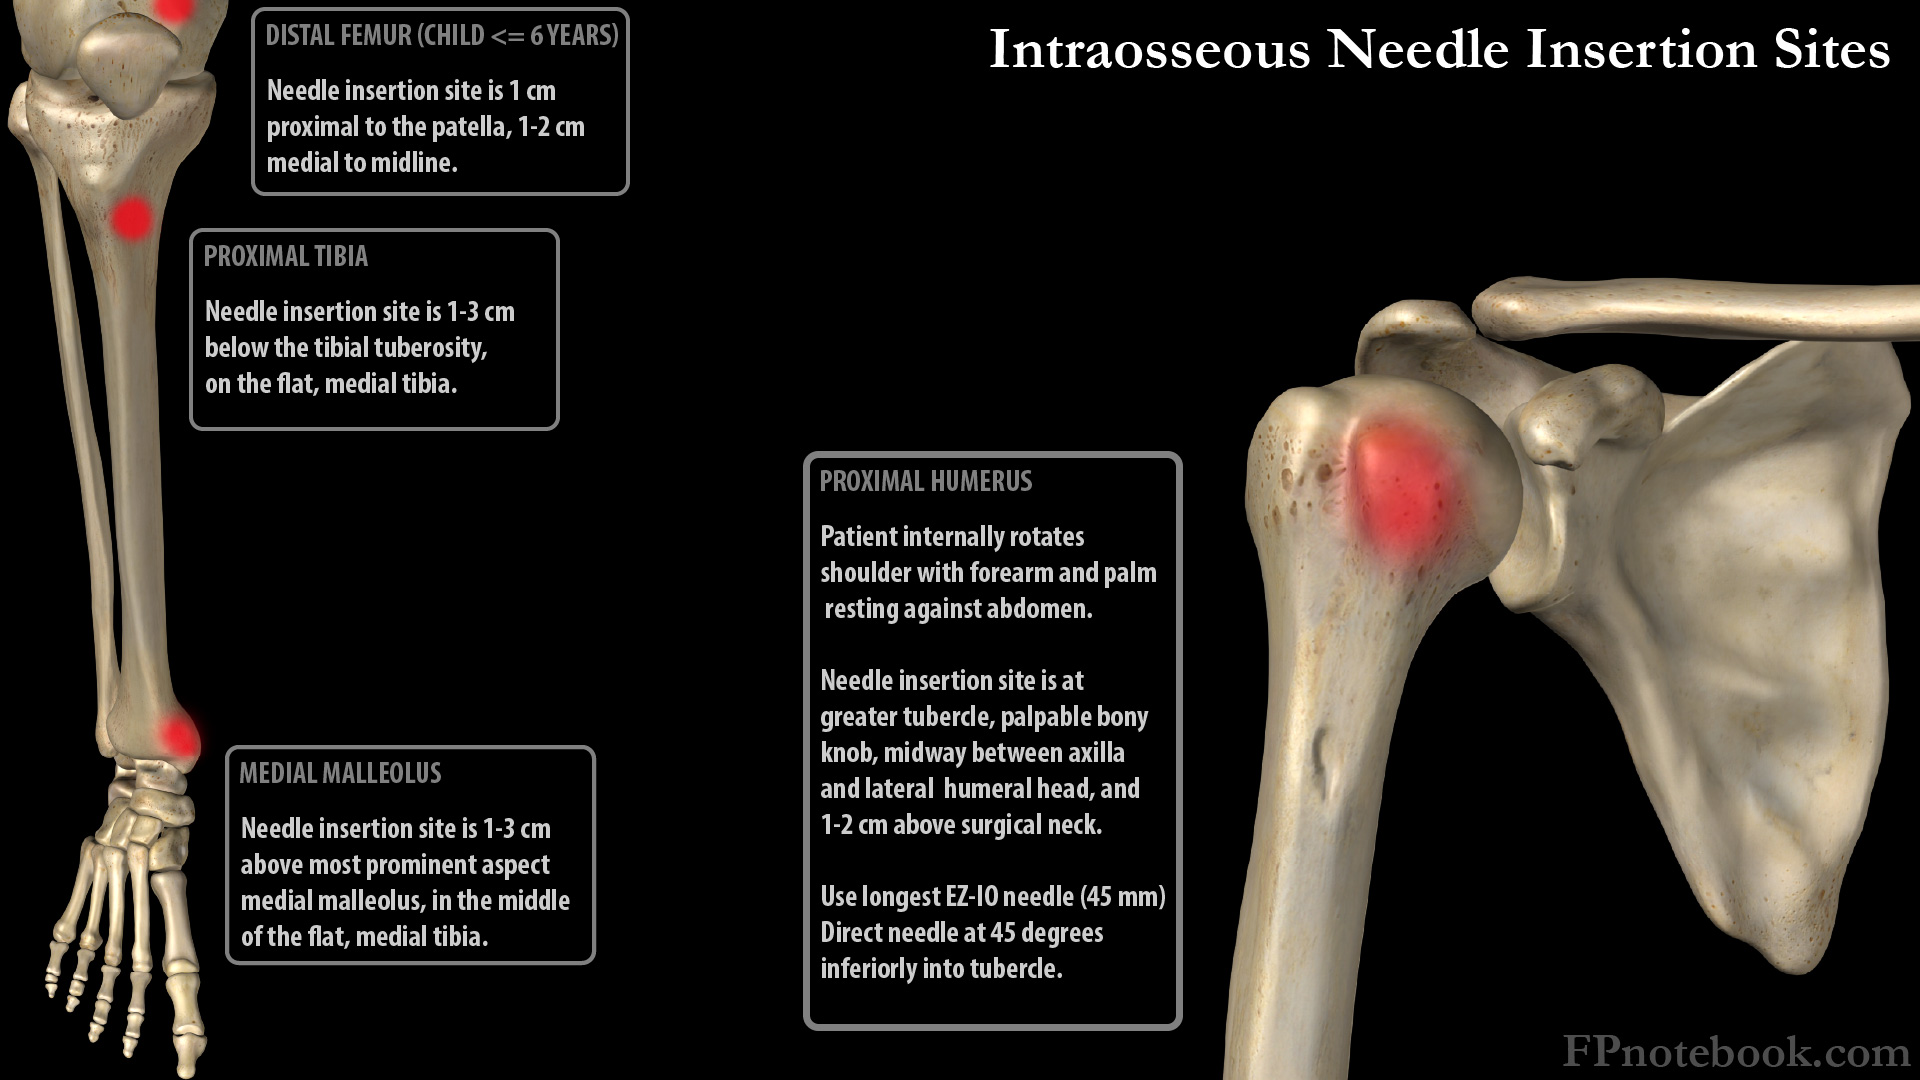
V. Preparation: Sites
- Images
- Medial proximal tibia medial to tibial tuberosity (standard IO site)
- Landmark: 2-3 cm below and medial to tibial tuberosity
- Two finger breadths below the lower Patellar pole in an adult (1 finger breadth in a child)
- Insert at flat anteromedial tibial surface (flat plane is oriented 45 degrees medially)
- Externally rotate hip to avoid injury to anterior tibial artery
- Landmark: 2-3 cm below and medial to tibial tuberosity
- Medial distal tibia proximal to medial malleolus
- Hip abducted and externally rotated with knee flexed
- Landmark: 2-3 cm proximal to medial malleolus on mid-point of flat medial tibia surface
- Insert IO perpendicular to flat tibia surface
- Angle IO very slightly proximally (toward knee) to avoid Epiphyseal Plate in children
- Proximal Shoulder at greater tubercle (greater tuberosity)
- Advantages
- Highest potential IO flow rates due to larger marrow space (up to 5 L/hour)
- Rapid entry to circulation (3 seconds to central circulation)
- Less pain with insertion and infusion
- No reported Compartment Syndrome complications
- Disadvantages
- Highest risk for IO displacement
- Positioning
- Identify IO insertions site at the greater tubercle
- Place ulnar aspect of one hand, oriented vertically over the axilla
- Place the other hand, oriented vertically over the lateral Shoulder
- Each thumb applied to the vertical midline between the 2 hands
- Palpate the line up and down to identify the humeral surgical neck where meeting the head
- Insertion point lies 1-2 cm (1 fingerbreadth) superior/proximal to the surgical neck
- Alternatively, palpate the bicipital groove at the biceps tendon insertion (overlying humeral head)
- Bicipital groove may be easily palpated on internal and external rotation of the Shoulder
- Insertion point lies 1-2 cm (1 fingerbreadth) lateral to the biceps tendon insertion
- Needle inserted into anterolateral Shoulder into greater tubercle
- Use a longer IO needle (yellow in an adult)
- Direct needle posteromedially (directly into largest marrow space and avoids Growth Plate)
- Directed 45 degree angle to the anterior plane
- Directed 45 degrees angle to the horizontal plane
- Insertion site landmarks
- Insert at 2 cm above the surgical neck of the Humerus
- Insert at 2 cm lateral to the bicipital tendon insertion
- Advantages
- Distal femur (child only <= age 6 years)
- Palpate the flat portion of the anterior distal femur, several centimeters superior to the knee
- Angle 75-80 degrees towards proximal femur, away from knee Physis
- Increase the needle size by 1 to ensure adequate depth
VI. Preparation: Patient comfort
- Background
- Insertion of IO is similar to IV Access pain
- Pain with IO is primarily with the infusion (see below)
- Indications for pre-medication
- Awake, alert children
- Options
- Pre-anesthetize the skin with Local Lidocaine injection
- Consider Intranasal Fentanyl 1.5 to 2 mcg/kg
VII. Technique: Insertion (EZ-IO)
- Identify landmarks for selected insertion site
- Have intravenous Lidocaine 2% and saline flush ready
- Flush the tubing with the Lidocaine solution (see dosing below)
- Prepare site (e.g. Betadine or Chlorhexidine)
- Chlorhexidine should dry for at least 30 seconds before use (Betadine for at least 3 minutes)
- Insert needle at 90 degrees (perpendicular) to skin surface
- Insert needle through skin by hand until it contacts bone
- At least one black marker (5mm) should be visible above skin margin
- If no marker is visible, then use a larger needle instead
- Attach needle driver
- Gently drive IO needle until bevel is at skin surface
- Stabilize needle and remove driver and stylet
- Flush the catheter
- Anesthetize the site in awake patients prior to fluid or medication infusion
- Flush line with 10 ml Normal Saline
- Catheter should flush easily
- If high resistance to flow, catheter is likely malpositioned
- Stabilize and protect catheter to prevent dislodgement
- Consider stabilizing with gauze to either side of the catheter
- Some use the cut bottom of a cup to place over the IO site
- Apply a sterile dressing over the top of the catheter
- May use Tegaderm with a central hole if specialized dressing is not available
- Intravenous infusion
- Will require a pressure bag for infusion
- Remove IO within 24 hours
- Mark the insertion site with a patient wrist band, indicating time and date of insertion
VIII. Technique: Removal (EZ-IO)
- Remove attached catheter
- Attach sterile syringe via luer-lock
- Turn syringe in clockwise direction while gently pulling until EZ-IO is removed
- Apply sterile bandage
IX. Complications (<1% of patients)
- Tibial Fracture
- Anterior tibial artery injury (risk of foot necrosis)
- Compartment Syndrome
- Skin necrosis
- Osteomyelitis
X. Technique: Lab sample via Intraosseous Line
- Precautions
- Other methods are preferred
- Risk of aspirated bone spicules damaging lab analysis equipment
- Technique
- Blood aspirated from intraosseous and first 2 ml discarded
- May be run off i-Stat point of care machines
- Labs with unreliable IO results (Avoid)
- Complete Blood Count
- Unreliable for Hemoglobin, Hematocrit, Platelet Count, White Blood Cell Count and differential
- Blood Gas
- Unreliable for pH (except in acidosis), pCO2, pO2
- Serum Potassium
- IO source results in falsely elevated Serum Potassium (2 mEq/L higher than serum sample)
- Complete Blood Count
- Labs with reliable IO results (via i-Stat)
- Serum bicarbonate
- Base Excess
- Serum Sodium
- Serum Calcium
- Serum Glucose
- References
XI. Resources
- Vidacare EZ-IO insertion video
- Dornhofer (2023) Intraosseous Vascular Access, StatPearls
XII. References
- Claudius, Behar, Chang and Santillanes in Herbert (2016) EM:Rap 16(4): 3-4