
II. Indications
- Primary Spontaneous Pneumonthorax
- Malignant effusion
- Stable Traumatic hemothorax or Pneumothorax
- Consult local expert opinion (some surgeons may request large caliber Chest Tube placement)
III. Contraindications
- Unstable Hemothorax or Hemopneumothorax
-
Traumatic Pneumothorax
- Outside of Hemothorax (and hemopneumothorax), Small Caliber Chest Tubes appear safe in uncomplicated Traumatic Pneumothorax
- Kulvatunyou (2014) Br J Surg 101(2): 17-22 [PubMed]
IV. Preparation
- Obtain small-calibre pigtail catheter Thoracostomy kit (typically 8 to 14 French catheter, up to <20 french)
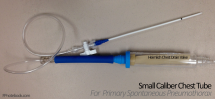
- Small Caliber Chest Tubes are also termed "pigtail" catheters as they curve at their distal end in a similar way to a pig's tail
- Elevate head of the bed to 30 degrees
- Conscious Sedation

V. Efficacy
- Small Caliber Chest Tubes are as effective and significantly less painful than standard Chest Tubes in Pneumothorax
- Small Caliber Chest Tubes are effective even in large spontaneous pneumothoraces
VI. Technique
- Identify entry site options
- Precautions
- Small Pneumothorax or effusion will be focal and a risk for lung injury on catheter entry
- Air pockets will be typically anterior, while fluid pockets in dependent positions
- Air and fluid pockets will change with patient positioning (e.g. upright Chest XRay versus supine positioning)
- Mid-clavicular line at the second intercostal space (over the third rib): Preferred site
- Same site as for Needle Thoracostomy (in Tension Pneumothorax decompression)
- Find the first palpable rib inferior to clavicle (2nd rib) and insert at the next inferior intercostal space
- Mid-Axillary line at the fifth intercostal space (over the fifth rib)
- Same site as for standard Tube Thoracostomy (as for Traumatic Pneumothorax)
- Safe entry site identification by Ultrasound (for smaller air or fluid pockets)
- Use Bedside Ultrasound to identify smaller pockets of fluid or air
- Measure depth from entry site to target pocket
- Stop catheter insertion if pleural air or fluid not aspirated within 2 cm of predicted insertion depth
- Reassess needle entry site and direction, and reattempt needle insertion
- Further needle insertion may be outside target pocket or within lung parenchyma
- References
- Swaminathan and Weingart (2022) EM:Rap 22(12): 3-6
- Precautions
- Select, mark and prepare the entry site
- Examiner puts on gown, glove and mask
- Mark the entry site (either option above)
- Chlorhexidine applied to skin (for 30 seconds)
- Drape (found in the catheter sets)
- Local Anesthetic
- Inject Lidocaine 1% with Epinephrine
- Raise a skin wheel then inject along the insertion site tract down to the pleura
- Nick the skin with #11 or similar blade
- Incision should be the same size as the tube
- Mini-tube or Pigtail (small-calibre, typically 8 to 14 French) Chest Tube insertion
- Prepare the catheter
- Insert trochar into pigtail catheter (the curly tip will straighten)
- No-Drop Technique (older, common method, non-seldinger technique)
- Insert the catheter (8 french) with small trochar
- Insert at the entry site, perpendicular to the skin, and immediately above the rib
- On breaching pleura, hear and feel pop as well as air rush or aspirate air in attached needle
- Redirect needle, aiming toward patients head
- Insert the trochar needle another 1-2 cm
- Thread the catheter over the top of the trochar needle and into the chest
- Insert the catheter until all tube holes are well within chest
- Withdraw the trochar
- Insert the catheter (8 french) with small trochar
- Drop Technique (Seldinger technique)
- Similar technique to Central Line Placement
- Select the kit's large bore needle (typically 16-18 gauge, large enough to accept the guidewire)
- Insert the needle at selected site, always over the top of the rib, perpendicular to skin surface
- On breaching pleura, hear and feel pop as well as air rush (or aspirate with syringe)
- Insert guidewire partially into chest, far enough that it will dislodge, but not so far as to misdirect the catheter
- Hold the guidewire firmly at one point throughout this process
- Remove introducer needle
- Insert dilator with twisting motion to form a tract for catheter insertion
- Perform this dilator insertion in and out several times to full thickness through pleura
- Skin and soft tissue should pucker out when withdrawing the dilator
- Insert the pigtail catheter (with trochar) over the guidewire
- Catheter is inserted into chest an adequate distance until all catheter holes are well within chest
- Remove the guidewire and trochar
- Prepare the catheter
- Secure the tube and attach apparatus
- Cover the Thoracostomy tube end to prevent increasing the Pneumothorax
- Place vaseline impregnated gauze (with slit cut) over chest wall entry site
- Place gauze pad under the Chest Tube to prevent kinking
- Suture the Thoracostomy tube in place in two places along it's course
- Consider reducing the Pneumothorax with aspiration (optional)
- Attach a three way stop cock to the Thoracostomy tube
- Attach a 20-30 cc syringe to the stopcock
- Continue to remove air by repeating the following steps until no further air can be aspirated from the pleural space
- Turn the stopcock to allow air to pass between the syringe and the Thoracostomy tube
- Aspirate air into the syringe
- Turn the stopcock toward the open side port and force all the air from the syringe through the open port
- Attach the Heimlich Valve
- Secure each tube connection with tape
- Secure the Heimlich Valve with foam tape
- Apply one strip to chest
- Apply one strip to enclose Heimlich Valve and attach to the chest tape
- Obtain a Chest XRay to confirm placement
VII. Disposition
- Observe after Chest Tube placement for 1-2 hours
- Repeat Chest XRay to confirm re-expansion
- Patient without signs of leak and otherwise stable and asymptomatic may be discharged
- Follow-up and recheck in 24-48 hours
-
Pneumothorax present for a longer period of time should be admitted and observed
- Risk of reexpansion Pulmonary Edema risk
VIII. Resources
- Pigtail Catheter Insertion Video (emcrit, Dr. Weingart)
- Pigtail Catheter Insertion Video (Dr. Sacchetti)
- Pigtail Catheter Insertion Video (essentialmedicalskills.com)
IX. References
- Arora and Menchine in Herbert (2014) EM:Rap 14(5): 11
- Spangler and Inaba in Herbert (2017) EM:Rap 17(4): 4-5